Ceaseless challenge toward the top
TECHNICAL INFORMATION
ndustrial water is sometimes taken from the stream or river, but use of highly contaminated water should be avoided.
Organic matters in the atmosphere delay concretion of plaster, which is easy to result in long hardening time (Setting time). In case a large amount of water soluble chloride such as sodium chloride, sodium sulfate and magnesium sulfate exist in the mixed water, they move even to the surface of mold during the time of drying, causing whitening event. The whitening event hinders viscosity of clay slip by making solid spots on the surface of gypsum mold and causes other side effects at times. It the water is drinkable, it would be appropriate for mixing plaster slurry.
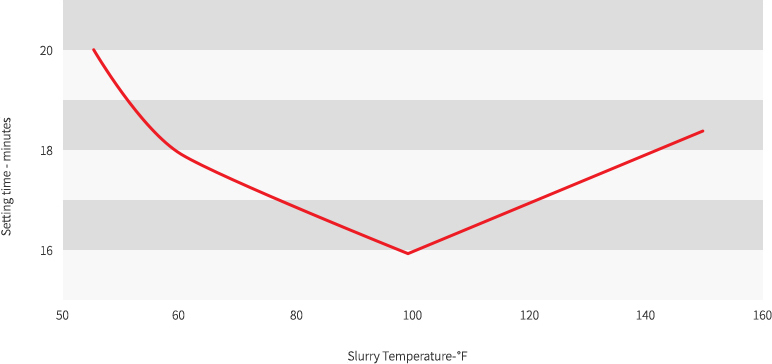
There is a theory that it is desirable to set temperature within a specific range from 21℃ to 38℃ and have gypsum to be crystallized within the temperature. Fluctuation of water temperature causes fluctuation of hardening time, which results in difficulties in controlling mixing time, so it is advisable to pay attention to fluctuation of water temperature and using a temperature control tank is also good for controlling water temperature.
| Types | Alpha Type | Beta Type | Beta Type | |
|---|---|---|---|---|
| Percentage of Water | 45 | 70 | 75 | |
| Tensile strength (kgㆍf/㎠) |
5℃ | 25.4 | 14.3 | 13.2 |
| 10℃ | 23.6 | 12.9 | 12.5 | |
| 20℃ | 22.1 | 12.3 | 12.4 | |
| 30℃ | 19.7 | 11.5 | 11.0 | |
| 40℃ | 18.3 | 10.7 | 9.4 | |
| 50℃ | 16.6 | 9.4 | 7.3 | |
Mixing ratio refers to the ratio of water to gypsum, that is to say the abbreviated name of water-to-plaster ratio. Korea, USA and Japan are keeping record the weight of water in the mixing ratio field when setting the weight of gypsum as 100, and Europe, the other way, is recording the weight or ratio of gypsum used when setting the weight of water as 100.
Change in mixing ratio of gypsum affects absorptiveness, strength, expansion, concretion time (setting time) etc. Setting the ratio of mixing gypsum which is used for pottery and hygienic pottery as 5~6% higher than standard mixing ratio is generally known to bring good results for absorptiveness and viscosity of clay slip, and it will be fine to adjust 2~3% higher than standard mixing ratio when using other general products. For industrial products which focus on size, degree of precision, durability of abrasion and strength, it is important not to exceed the standard mixing ratio. To measure standard mixing ratio, make sure to follow the method for measurement of mixed quantity in KSL 9002. (same as JIS standard)
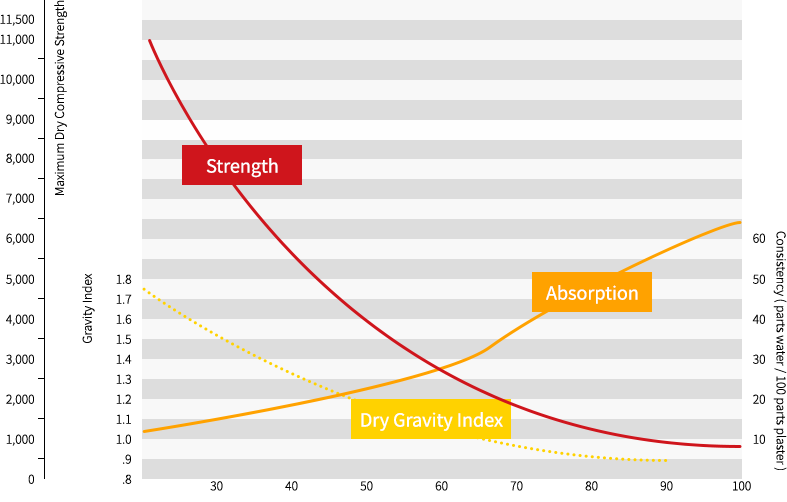
The following is comparison in change of material property according to change of mixing ratio. The results of testing by varying mixing ratio of plasters with 75% of standard mixing ratio is shown in Table 2. The higher the mixing ratio, the longer the concretion time bud the smaller the expansion. And strength decreases straightforward together with increase of mixing ratio. However, bubble inclusion becomes larger and flow becomes difficult when setting the ratio below standard mixing ratio.
Figure 2 shows physical property change of gypsum according to change of mixing ratio
| Types | Alpha Type | Beta Type | Beta Type | |
|---|---|---|---|---|
| Percentage of Water | 45 | 70 | 75 | |
| Tensile strength (kgㆍf/㎠) |
5℃ | 25.4 | 14.3 | 13.2 |
| 10℃ | 23.6 | 12.9 | 12.5 | |
| 20℃ | 22.1 | 12.3 | 12.4 | |
| 30℃ | 19.7 | 11.5 | 11.0 | |
| 40℃ | 18.3 | 10.7 | 9.4 | |
| 50℃ | 16.6 | 9.4 | 7.3 | |
As the particles of plaster are generated, those particles are encircled by the air. Part of the air is removed in the course of aging and handling, and another is partially removed again while being inserted into the water.
If the time for soaking (sprinkle evenly) plaster is too short of failure of uniformed dispersion may result in non-uniformed strength of using form or uneven absorption as plaster cannot be dispersed enough in the water. In case of pouring in clumps in a short period of time or failure in mixing with hands or machine may cause fault by pinholes, which increases in production cost as a result due to increase in finish work for slip or hilling created.
Fixation refers to soaking plaster in the water during a certain period of time after pouring it. If all the particles of plaster are evenly poured, almost all become wet by the water after 3~4 minutes. Bulk of particles are not wet at times even after finish of fixation time and these dried particles are hard to be dispersed within the stirring time, which may cause various shaped malformed case molds. Fixation time for gypsum should be measured from the start of pouring up to 3 minutes. When pouring plaster into water, either gypsum spreader or hands would be all right, but pouring by dispersing evenly is important. Here, 2 minutes would be good for pouring.
Plaster which is sufficiently wet in the water is to undergo mixing process by using a container that both constant speed and easy stirring are available until the plaster reaches appropriate viscosity. The longer the stirring time, the higher the viscosity as well as quicker the hardening and cycle in the mold. Therefore, this increases production of gypsum mold. If stirring time is too much lengthened, however, viscosity increases and becomes unable to pour in several case molds, which cause delay of forming operation due to decrease in water absorption ratio. And production of products within a specific period of time rather decreases. Even for gypsum molds with same mixing ratio, expansion becomes larger as strength increases when pouring it into the case mole when stirring time prolonged and viscosity heighted excessively, so special attention must be paid in manufacturing industrial models or cases that must focus on the precision of size. Contrary to this, the shorter the stirring time, the longer the hardening of gypsum and this causes decrease in production of molds.
| Mixing Time(min) | 0 | 1 | 2 | 3 | 4 | 5 |
| Pouring Time(min) | 3 | 4 | 4 | 6 | 7 | 8 |
| Start Setting(min,sec) | 27.15 | 15.30 | 15.30 | 11.45 | 10.30 | 9.45 |
| Termination(min,sec) | 56.2 | 35.45 | 32.15 | 28.0 | 24.45 | 22.0 |
| Tensile strength(kgㆍf/㎠) | 10.3 | 12.6 | 13.3 | 14.0 | 14.2 | 13.6 |
| Bending Strength(kgㆍf/㎠) | 26.4 | 32.4 | 35.1 | 38.1 | 38.7 | 34.8 |
| Compressive Strength(kgㆍf/㎠) | 49.5 | 75.2 | 85.6 | 90.7 | 88.6 | 83.6 |
| Expansion Rate(%) | 0.050 | 0.126 | 0.170 | 0.205 | 0.228 | 0.184 |
Work of pouring gypsum slurry into the case mold is called injection. When injecting gypsum slurry which reached appropriate viscosity into the case mold, special attention must paid to prevent gypsum slurry from flowing crossing case mold by carefully pouring into the corner of one side. Also, pouring gypsum slurry into the inner side in quantity causes the result that gypsum mold becomes dense in the region where gypsum slurry is first hit, which makes the part into solid spot that absorption of mold becomes uneven. When shaking case mold filled with gypsum slurry, part of air which was entrained at the time of injection rises above the surface. The faster the work of injection of (pouring) gypsum slurry, the more the gypsum mold become uniformed. For appropriateness of injection of gypsum slurry, please refer to mixing part.
Drying process strengthens mold stabilizes water absorption ratio, increases productivity and reduces weathering and wind damage. Heat, air circulation and relative humidity become the standard for keeping molds dry. Air circulation must be perfectly made inside the drying room and it is important to circulate at 15ft/sec.
Dry and Strength
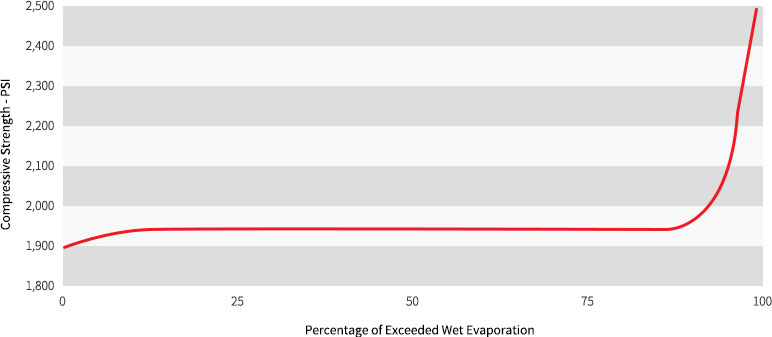
Mold obtains perfect strength when water is removed up to 8% from the mold. The rate of increase in strength is approximately 30%. Figure 3 shows the range of water (wet) strength of plaster mold. In general, slip-cast is not used when plaster mold is being dried. It is necessary to take note that water (wet) strength in mold is consistent on the contrary to the range of water content. If putting a mold into the drying room immediately after producing in the workshop, strength will decrease drastically and even the result similar to Table 1 ‘Temperature & Property of Plaster’ can be predicted. And in case there is necessity to dry mold unavoidably when curing period is short, it is desirable to put it into the drying room after 12 hours at the least. When lathering the separator K-soap on the case, special attention must be paid as insoluble salts stick to using form and cause skinning, wrinkle and crack if the amount if excessive. At this time, while drying, it is effective to induce the direction of water evaporation to the other side of surface used in forming. Also, you may obtain effect of decreasing fraction defective if you form after opening an air vent by soaking gypsum mold into warm water 1~2 times intermittently after drying it
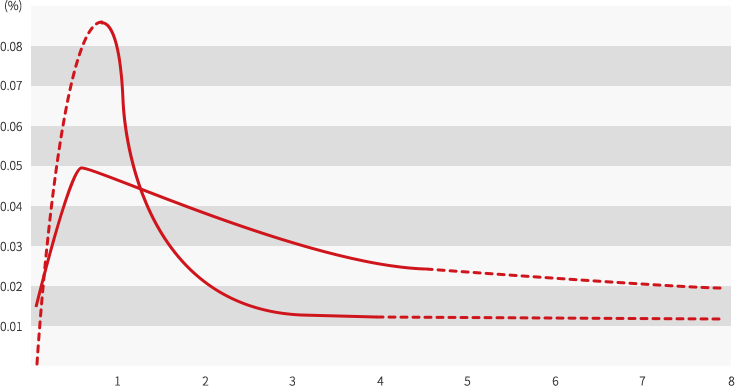
Quick Drying
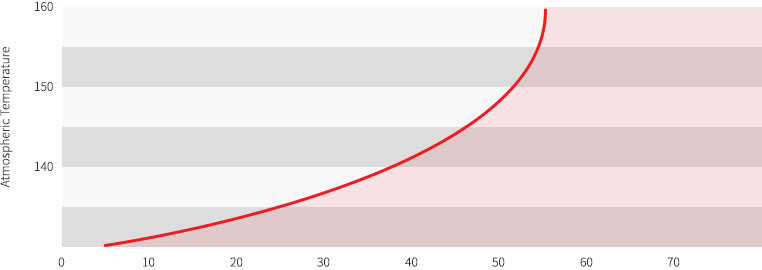
A good way to adjust making the best use of drying process is to follow temperature and relative humidity curve. The method of adjusting those two variables is to allow drying time to the maximum.
Figure 4 shows the maximum drying curve. Plaster mold is dried the most rapidly when any part of curve or relative humidity and temperature on the right part of it accord with each other. Dry condition in the left part of curve diminishes mold.
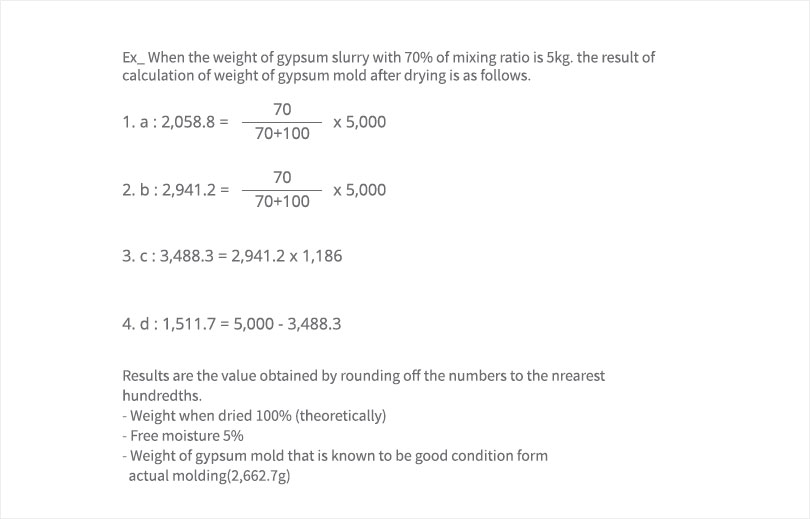
Reference - How to make gypsum slurry
When using a sack of low expansion light plaster GEMSTONE L -13, that is to say 25kg, for example, please make sure to use by measuring the weight of water accurately by the following calculation formula on the basis of standard mixing ratio 40% as described in our company’s Test Report.
25kg × 40/100 = 10kg
To be specific, the weight of water becomes 10kg.
After having GEMSTONE 25kg wet sufficiently in the water by evenly dispersing it, leave it for 2~3 minutes and make gypsum slurry by fully stirring it at 50~100 times speed per minute with hands in rubber gloves. In gypsum except for industrial GEMSTONE and special grade gypsum GM-10, GM-30 for making pottery cast, you must add antifoaming agent. For the amount of water, please follow our company’s Test Report.
- Example of using special CH gypsum and water Ex. 25kg × 70/100 =17.5kg
- Example of using special GM-30 gypsum and water Ex. 25kg × 45/100 = 11.25kg
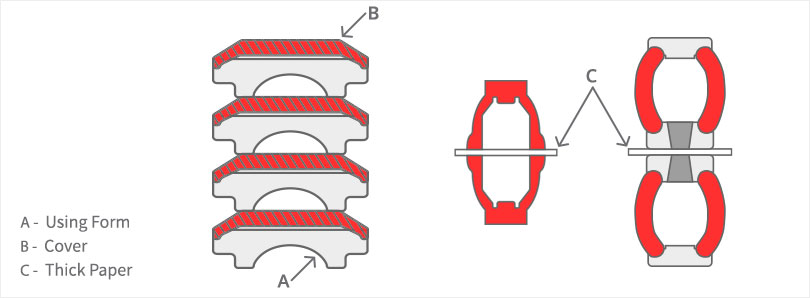
How to attach wireHow to attach wire
In case of a gypsum mold without legs made by mold method, for example, bury a metal pin which is rounded 10mm encircling the part where wire is attached with oil clay on the depths 10~15mm from the surface of gypsum slurry or let one side come forward about 50mm from the edge plate with a 30mm wide and 20mm long pipe by making 3~4 holes on the edge plate of model and inject gypsum slurry after to keep gypsum slurry from leaking. After hardening of gypsum is completed, unfasten the edge plate and remove oil clay and release after attaching a wire for crane to the metal pin or metal pipe and move gypsum mold to the place you need it.In case of a gypsum mold without legs made by mold method, for example, bury a metal pin which is rounded 10mm encircling the part where wire is attached with oil clay on the depths 10~15mm from the surface of gypsum slurry or let one side come forward about 50mm from the edge plate with a 30mm wide and 20mm long pipe by making 3~4 holes on the edge plate of model and inject gypsum slurry after to keep gypsum slurry from leaking. After hardening of gypsum is completed, unfasten the edge plate and remove oil clay and release after attaching a wire for crane to the metal pin or metal pipe and move gypsum mold to the place you need it.
How to make an opening of compressed airHow to make an opening of compressed air
Even after dispersing separator on the surface of model, the intervals between model and hardened gypsum mold remains as the state of vacuum, so the shape of gypsum can be damaged if you try to release by force with a crane etc. To prevent it and make it easier, it is clever to enter compressed air between model and hardened gypsum mold.Even after dispersing separator on the surface of model, the intervals between model and hardened gypsum mold remains as the state of vacuum, so the shape of gypsum can be damaged if you try to release by force with a crane etc. To prevent it and make it easier, it is clever to enter compressed air between model and hardened gypsum mold.
To make the air inlet, stick a sharp metal pin on the surface of model by introducing introduce gypsum paste before it is hardened and pull out it before slurry is perfectly hardened. After hardening is completed, dismantle edge plate and put the rubber pipe of compressed air in the metal pin or pipe or air inlet and release with a crane by letting compressed air when the model of gypsum mold floats slightly. After releasing, block one side of hole with clay by reversing the model and correct after gypsum is hardened by introducing gypsum slurry on the surface of gypsum mold.To make the air inlet, stick a sharp metal pin on the surface of model by introducing introduce gypsum paste before it is hardened and pull out it before slurry is perfectly hardened. After hardening is completed, dismantle edge plate and put the rubber pipe of compressed air in the metal pin or pipe or air inlet and release with a crane by letting compressed air when the model of gypsum mold floats slightly. After releasing, block one side of hole with clay by reversing the model and correct after gypsum is hardened by introducing gypsum slurry on the surface of gypsum mold.
Time of ReleasingTime of Releasing
When releasing concave cast from convex one, release it when gypsum mold reached the maximum expansion and slightly declined from it, that is to say when temperature of gypsum mold falls slightly after 1~1.5 hours passed after introducing gypsum slurry.
When releasing convex cast from concave one, release it when expansion of gypsum mold declined gradually from the maximum expansion, that is to say when the temperature of gypsum mold gradually dropped and became chilled when touching it after about 8 hours passed after introducing gypsum slurry. In case of a large laminated model, it is advisable to take the cast off on 8:00 the next morning after introducing gypsum in the previous afternoon.